What Is Dye Penetrant Testing?
Dye penetrant testing is a widely used non-destructive inspection method that helps inspectors detect surface flaws in materials. It involves applying a special dye to the surface of an object, allowing it to seep into any cracks or defects. Afterward, a developer is applied to draw out the dye and make the flaws visible.
This technique is also commonly referred to as liquid penetrant testing or liquid dye penetrant testing. In many industries, it's known by various names such as dye penetrant inspection (DPI), liquid penetrant inspection (LPI), or simply penetrant testing (PT).
In this guide, we will use "dye penetrant" and "liquid dye penetrant" interchangeably, as they are essentially the same method. This approach aligns with the industry terminology used across different sectors.
Dye penetrant testing is one of the most popular non-destructive testing (NDT) methods because it’s cost-effective, easy to perform, and doesn’t require complex equipment. It allows inspectors to examine surfaces without causing any damage to the material being tested.
[Dye penetrant NDT is just one of the many non-destructive testing (NDT) methods that inspectors use. Learn more about NDT in this comprehensive guide.]
Understanding Dye Penetrant Testing
Dye penetrant testing is primarily used to identify surface cracks and other discontinuities on components made from ceramics, plastics, and metals. The process relies on capillary action, where the dye flows into small cracks or pores on the surface.
Once the dye has had time to penetrate, a developer is applied to the surface. This developer draws the dye back up, making the defects clearly visible for inspection. This makes it a highly effective way to detect surface imperfections that might otherwise go unnoticed.
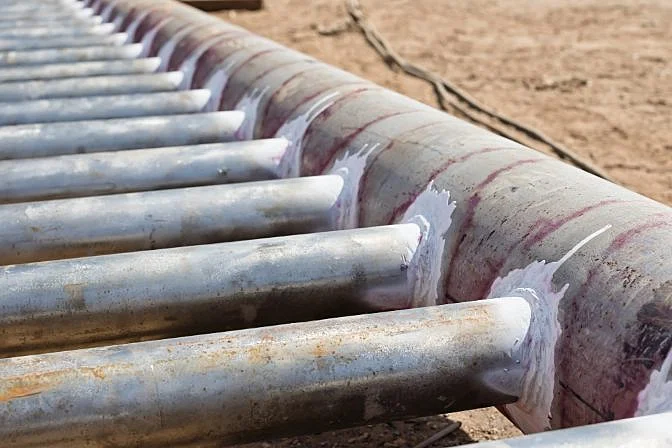
This method is frequently used in industries such as aerospace, automotive, and manufacturing to inspect critical parts like welds, castings, forgings, plates, bars, and pipes.
Common defects found using this technique include leaks, joint flaws, fractures, porosity, cracks (including fatigue, hairline, and grinding cracks), and incomplete fusion.
The origins of dye penetrant testing date back to the early 20th century when it was first used in the railroad industry. Initially, the oil and whiting method was employed, where a surface was cleaned and then coated with chalk to reveal oil seepage from cracks. Later, dyes were added to improve visibility, leading to the modern dye penetrant testing method we know today.
Advantages and Disadvantages of Dye Penetrant Testing
Dye penetrant testing is a popular choice among inspectors due to its affordability and ease of use. However, it also has certain limitations. Here are some of the key pros and cons:
Pros
- Easy to apply even on complex shapes and surfaces
- Low cost, requiring minimal equipment
- Quick to cover large areas
- Visual results that show the size and location of defects
- Applicable to a wide range of materials, including ferrous and non-ferrous, conductive and non-conductive, and magnetic and non-magnetic
Cons
- Only detects surface-breaking defects
- Cannot be used on porous materials
- Requires clean, uncoated surfaces
- Needs direct access to the material
- Several steps involved, each affecting accuracy
- Requires cleaning before and after the test
- Use of chemicals may pose safety risks
Step-by-Step Procedure for Dye Penetrant Testing
Dye penetrant testing typically follows six main steps to ensure accurate detection of surface flaws:
1. Surface Preparation
The first step is to thoroughly clean the surface to remove dirt, grease, paint, or any other contaminants. This ensures that the dye can effectively penetrate any existing cracks or defects.
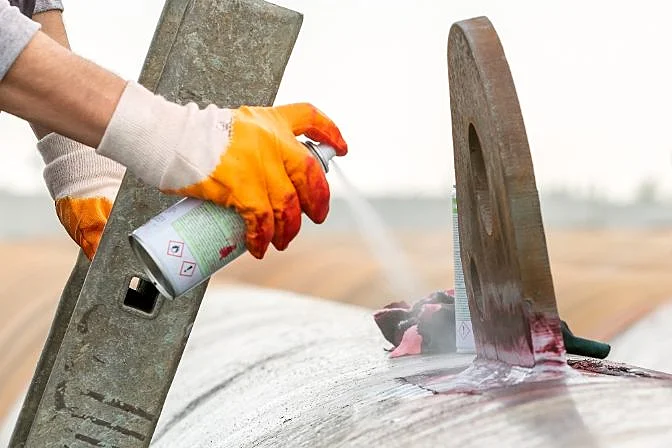
2. Apply the Penetrant
A specially formulated penetrant is applied to the surface using a spray, brush, or other suitable method. It is left to dwell for a specific amount of time, usually between 5 and 20 minutes, depending on the product instructions.
3. Remove Excess Penetrant
After the dwell time, excess penetrant is removed using a dry cloth or appropriate cleaner. A remover may also be used to help eliminate any remaining dye that hasn't entered the cracks.
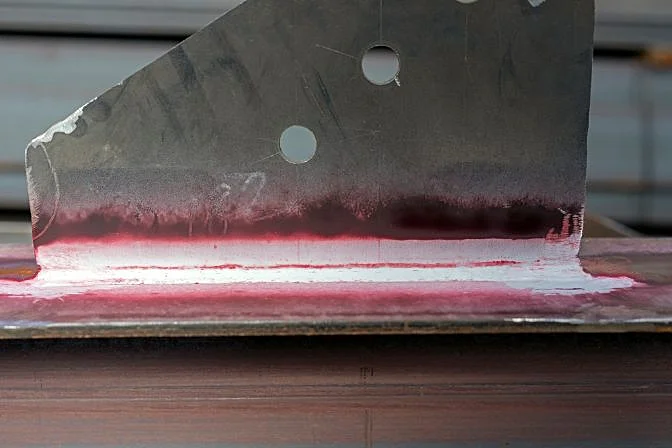
4. Apply the Developer
A white developer is applied to the surface. This draws the penetrant from the cracks and makes them visible under normal or ultraviolet light.
5. Inspect the Surface
Inspectors then examine the surface using either natural light or UV light, depending on the type of penetrant used. Visible dye penetrants are seen under regular lighting, while fluorescent ones require UV light for visibility.
6. Clean the Surface
Finally, the surface is cleaned to remove any residual penetrant and developer, returning it to its original condition.
Selecting the Right Penetrant, Remover, and Developer
Inspectors have several options for choosing the penetrant, remover, and developer based on the material and conditions of the surface being tested. Each combination can be tailored to meet specific needs.
Penetrant Types: Color contrast, fluorescent, or combination (both color and fluorescent)
Remover Types: Solvent-based, post-emulsifiable, water-soluble, or water-suspendable
Developer Types: Dry powder, aqueous, or non-aqueous
The choice depends on factors such as surface type, size, and complexity, ensuring optimal results during the inspection process.
Standards and Codes for Dye Penetrant Testing
Although dye penetrant testing is often used for general inspections, it is also widely adopted in code-compliant applications. These require strict adherence to standardized procedures and certified personnel.
Some of the most commonly referenced standards include:
ASTM (American Society for Testing and Materials)
- ASTM E 165: Standard Practice for Liquid Penetrant Examination for General Industry
- ASTM E 1417: Standard Practice for Liquid Penetrant Testing
- ASME BPVC, Section V, Article 6: Liquid Penetrant Examination
- ASME BPVC, Section V, Article 24: Standard Test Method for Liquid Penetrant Examination SE-165
ISO (International Organization for Standardization)
- ISO 3452-1: Non-destructive testing - Penetrant testing - Part 1: General principles
- ISO 3452-2: Non-destructive testing - Penetrant testing - Part 2: Testing of penetrant materials
- ISO 3452-3: Non-destructive testing - Penetrant testing - Part 3: Reference test blocks
- ISO 3452-4: Non-destructive testing - Penetrant testing - Part 4: Equipment
- ISO 3452-5: Non-destructive testing - Penetrant testing - Part 5: Penetrant testing at temperatures higher than 50°C
- ISO 3452-6: Non-destructive testing - Penetrant testing - Part 6: Penetrant testing at temperatures lower than 10°C
- ISO 3059: Non-destructive testing - Penetrant testing and magnetic particle testing - Viewing conditions
- ISO 12706: Non-destructive testing - Penetrant testing - Vocabulary
- ISO 23277: Non-destructive testing of welds - Penetrant testing of welds - Acceptance levels
CEN (European Committee for Standardization)
- EN 1371-1: Founding - Liquid penetrant inspection - Part 1: Sand, gravity die and low pressure die castings
- EN 1371-2: Founding - Liquid penetrant inspection - Part 2: Investment castings
- EN 10228-2: Non-destructive testing of steel forgings - Part 2: Penetrant testing
- EN 10246-11: Non-destructive testing of steel tubes - Part 11: Liquid penetrant testing of seamless and welded steel tubes for the detection of surface imperfections
For more information on these standards, you can visit the official websites of the following organizations:
- American Society of Mechanical Engineers (ASME)
- American Society for Testing and Materials (ASTM)
- The National Board of Boiler and Pressure Vessel Inspectors (NBIC)
- International Standards Organization (ISO)
Arctic Oasis Collection: Embrace Revitalizing Cold Plunge Baths
Dive into the ultimate recovery experience with our Arctic Oasis Collection, featuring an array of cutting-edge products for ice baths, cold plunge tubs, and portable solutions. Discover the transformative power of cold therapy with our meticulously designed cold plunge baths, each offering a refreshing journey towards muscle recovery and rejuvenation.
Revolutionary Cold Plunge Solutions: Portable Ice Baths & More
Revolutionize your wellness routine with our range of innovative cold plunge solutions, including portable ice baths and customizable ice barrels. Tailored for convenience and effectiveness, these products bring the invigorating benefits of cold therapy to your fingertips, promoting improved circulation, reduced inflammation, and an unparalleled sense of well-being.
Chill Anywhere, Anytime: Portable Ice Baths for Modern Lifestyles
Introducing our line of portable ice baths, redefining the concept of on-the-go recovery. Crafted for modern lifestyles, these portable solutions allow you to enjoy the benefits of cold plunge therapy wherever you are. Immerse yourself in the refreshing embrace of cold water therapy, unlocking a world of physical revitalization and mental clarity.
Ice Bath Innovation: Elevate Your Wellness with Arctic Serenity
Elevate your wellness journey with our ice bath innovation. Whether you prefer the soothing depths of a cold plunge tub, the compact convenience of a portable ice bath, or the rustic charm of an ice barrel, our Arctic Oasis Collection has it all. Immerse yourself in the rejuvenating world of cold therapy, where innovation meets tranquility for a truly transformative experience.
cold plunge tub, ice barrel, ice tub, portable ice bath, ice plunge tub
Lixin Outdoor Product Co., Ltd , https://www.pdinflatable.com